
The soup was better last time, but the only note beside the recipe says “add more.” More of what, and before or after simmering? These recipe journal ideas help you keep the details that disappear between cooking attempts, with pages you can write on your iPad.
Start with one recipe you already want to make again. Capture what you changed, what happened and what deserves another try. You do not need to fill every prompt below or buy a new notebook: an existing blank page is enough to begin.
25 Recipe Journal Ideas for the Next Time You Cook
Think of the journal as a working record beside your finished recipe collection. Choose a few prompts from each stage. The examples are suggested entries, not tested recipes or instructions for changing cooking temperatures.
Keep a useful starting point
- 1Save the source and the version. Write the author, book page or original URL, followed by the date you cooked it. Add a short version name such as “tomato soup, first try.” A screenshot alone can lose the source and leave you unsure which instructions you followed.
- 2Describe your target. Before cooking, finish the sentence “I want this to be…” with something observable, such as a crisp edge or a sauce that coats a spoon. Keep the goal separate from the result so your final verdict answers the question you began with.
- 3Leave room for first-attempt observations. Record one thing you noticed during preparation and one at the table. “Dough stuck to the scraper” is more useful than “difficult.” A small observation can suggest what to investigate without blaming the entire recipe.
- 4Pair a substitution with its outcome. Note the original ingredient, the replacement and the quantity actually used. Then describe the result in its own line. Treat that as a record of this attempt, not proof that the substitution will work in every recipe.
- 5Write down the batch you actually made. Record the recipe’s stated yield beside your chosen quantities. If you scaled the batch, keep the arithmetic visible and check it independently. Your journal is a place to record calculations, not an automatic quantity converter.
Notice what happened during preparation
- 6Separate active time from elapsed time. Note when hands-on preparation began, any waiting period and when you served the dish. You might discover that chopping took longer than expected. This helps you judge whether the recipe fits a future evening without rewriting your weekly menu.
- 7List the equipment that mattered. Include the mixer attachment, blender or other tool that shaped the process. Add a brief observation such as “needed to scrape the sides twice.” The point is to make the next attempt easier to repeat, not to build a kitchen inventory.
- 8Record the pan or vessel. Write its dimensions, material and the size of the batch beside it. If the result changes next time, you have a concrete detail to compare. Do not assume a different pan needs the same timing merely because the ingredients match.
- 9Mark the step that caused a delay. Was an ingredient still unmeasured when the pan needed attention? Quote the step briefly and add your own preparation reminder. A note such as “measure the sauce ingredients before starting” gives the next attempt a clear action.
- 10Capture texture at two moments. Describe the mixture before cooking and the finished dish afterward, using plain words such as loose, smooth, grainy or firm. A photo can support the note, but write the observation too: lighting can make two batches look more alike than they felt.
Write a verdict you can understand later
- 11Describe flavor instead of giving only stars. Record what stood out: sharp lemon, a mild finish or too much sweetness for your preference. A three-word explanation beside a rating tells you what the score meant. Keep personal preference separate from a claim that the recipe is wrong.
- 12Note what was added at the table. If someone chose extra pepper or a squeeze of lemon, record it as optional serving feedback. You can then decide whether it belongs in the recipe or simply suits that person. You do not need to adjust the whole batch for one preference.
- 13Compare the expected and actual portions. Note the stated serving count and what you served in practice, including whether it was a main dish or a side. This describes your table, not a universal portion standard. It can explain why a recipe labeled “four servings” felt different.
- 14Keep a simple leftovers note. Write how much remained after serving and whether that amount was useful to you. “One lunch portion left” gives more context than “too much.” Leave storage times and food-safety decisions to reliable guidance rather than an informal journal rule.
- 15Record a reheating preference. Describe how the texture or flavor seemed when you ate the leftovers and whether you enjoyed that version. This is a personal observation, not evidence that food was safe to eat. Keep any safety question separate from the taste verdict.
Make the next comparison clearer
- 16Try a presentation note. Sketch how you served the dish or add a small photo with a caption. Record a practical difference, such as whether the garnish stayed crisp until serving. One useful detail beats decorating an entire page before you know whether you will cook it again.
- 17Choose one intentional change. For a comparison, label the next attempt with one planned adjustment and keep other details as similar as practical. If several things change anyway, list them. You can still enjoy the result without claiming you have isolated the cause.
- 18Build a two-version spread. Put the earlier attempt on the left and the newer attempt on the right. Use matching headings: quantity, equipment, observation and verdict. If you compare more versions, give each its own small block rather than squeezing every trial into a wide spreadsheet.
- 19Ask willing tasters a specific question. “Which texture did you prefer?” is easier to answer than “Is it good?” Note whose feedback it was and keep different opinions separate. If nobody else tried it, your own observation is enough; a cooking journal does not need a panel.
- 20Keep preference checks explicit. Write questions you need to resolve before cooking for someone, such as whether they like a particular spice. Allergies and dietary restrictions need direct confirmation and suitable professional guidance when relevant. A decorative checkbox is not proof that a dish is suitable.
Decide what deserves another attempt
- 21Log an availability workaround. When the shop lacked an ingredient, record what was unavailable and what you chose instead. Link this entry to the substitution note, so you remember why the version changed. Keep the original recipe intact rather than silently replacing its ingredients.
- 22Describe an unsuccessful attempt without blame. Split the page into “what happened” and “what I do not know yet.” For example, an uneven result may be clear while its cause is not. That distinction keeps the note honest and avoids turning a guess into a permanent instruction.
- 23End with one next-attempt adjustment. Make it specific enough to act on: “record the pan dimensions before starting” or “compare the original ingredient next time.” Put other possibilities on a separate later list. A page with five competing fixes can be hard to use at the stove.
- 24Mark the version you want to keep. Write its version name and why you prefer it, with a short reminder of any limitation. You might keep one version for its texture and another for easier preparation. There is no need to force a single winner when they serve different purposes.
- 25Transfer the settled recipe to your archive. Copy the ingredient list and method you intend to repeat into your recipe book, keeping a reference back to the trial notes. The archive holds the clean version; the journal retains the changes and questions that explain how you arrived there.
A Recipe Trial Page You Can Copy by Hand
For simple recipe journal ideas for beginners, four headings are enough: source, actual version, result and next try. Add extra fields only when they help explain a difference. Here is a fictional entry showing the level of detail I mean.
- Source: tomato soup, book title and page; trial A, November 6.
- Actual version: original ingredient list followed; medium saucepan; quantities recorded on the recipe page.
- Observation: smooth texture, but the finish tasted sharper than I wanted.
- Next try: repeat the original version and note the ingredient brand before considering a change.
Notice that the observation does not prescribe a fix. You can keep an unanswered question in a useful journal. If you cannot remember a quantity, write “not recorded” instead of filling the gap with a plausible number.
Three Digital Journals for Different Kinds of Kitchen Notes
I selected one dedicated recipe log for ingredients and methods, a two-column notebook for comparisons and a ruled journal for longer observations. These are digital pages, not recipe-management apps, and the general journals do not include the 25 prompts above as ready-made cooking templates.
TL;DR: Start with a source, the version you cooked, an observation and one next change. Below are one recipe log and two general digital journals; the general notebooks need your own cooking headings.
Quick Picks
- Best for a structured recipe record: Recipe Log – Printable & Digital Recipe
- Best for side-by-side trial notes: Digital Notebook
- Best for a dated cooking diary: Digital Ruled Journal
- Recipe Log – Printable & Digital Recipe – Best for a structured recipe record
- Digital Notebook – Best for side-by-side trial notes
- Digital Ruled Journal – Best for a dated cooking diary
Best for a structured recipe record
1. Recipe Log – Printable & Digital Recipe
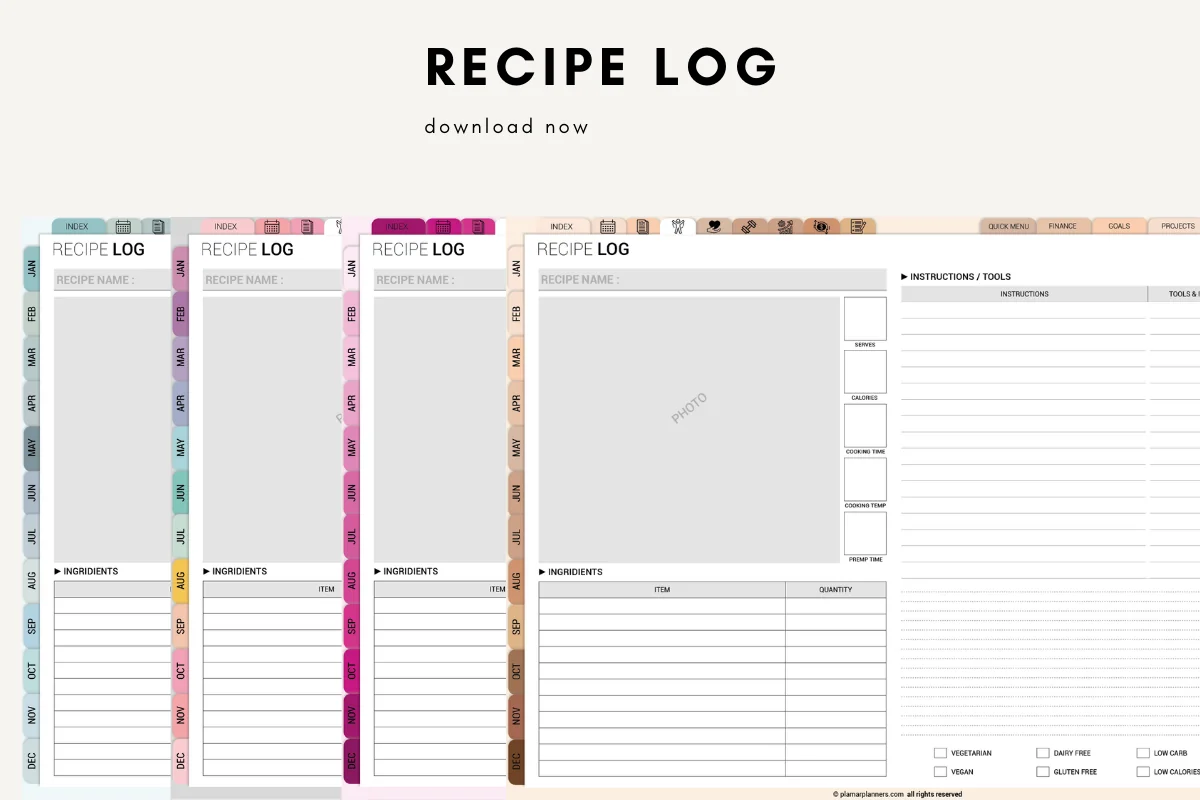
Orientation: Landscape spread shownLayouts: Recipe log, ingredients, instructions and toolsFormat: Digital and printable PDF
Best for: keeping ingredients, quantities and cooking details together. Designed by Plamarplanners.
- Recipe name and photo space, with an ingredient-and-quantity table
- Instructions beside a tools-and-utensils column
- Fields for servings, cooking time, cooking temperature and prep time
- GoodNotes and Notability compatibility listed, alongside printable A4 and US Letter PDF files
The ingredient table gives a trial a useful starting point: record the amount you actually used. I like the tools column for noting the pan alongside the method. The previews show one recipe layout in several colors, rather than six distinct layouts. Although the description lists notes and adjustments, a separate adjustments page is not pictured. Leave extra space for longer observations, and do not assume the surrounding planner tabs mean a full planner is included.

Best for side-by-side trial notes
2. Digital Notebook
Orientation: LandscapeLayouts: Blank, lined, dotted, graph, two-column and CornellSections: 12Format: Digital notebook
Best for: drawing an original-versus-change comparison and grouping cooking experiments. Designed by Shades of Zen.
- 12 sections with hyperlinked tabs described by the designer
- 16 note templates, including lined, dotted, graph and Cornell pages
- Two-column and blank page options pictured
- GoodNotes and other PDF annotation apps named in the description
Two columns are the useful difference here. Put the original approach on the left and your actual change on the right, then write a short verdict underneath. The purple landscape notebook has general note pages rather than ready-made recipe testing sheets: headings, recipe names and any subject index are yours to add. It suits a growing experiment log better than someone who wants preprinted ingredient fields.
Best for a dated cooking diary
3. Digital Ruled Journal
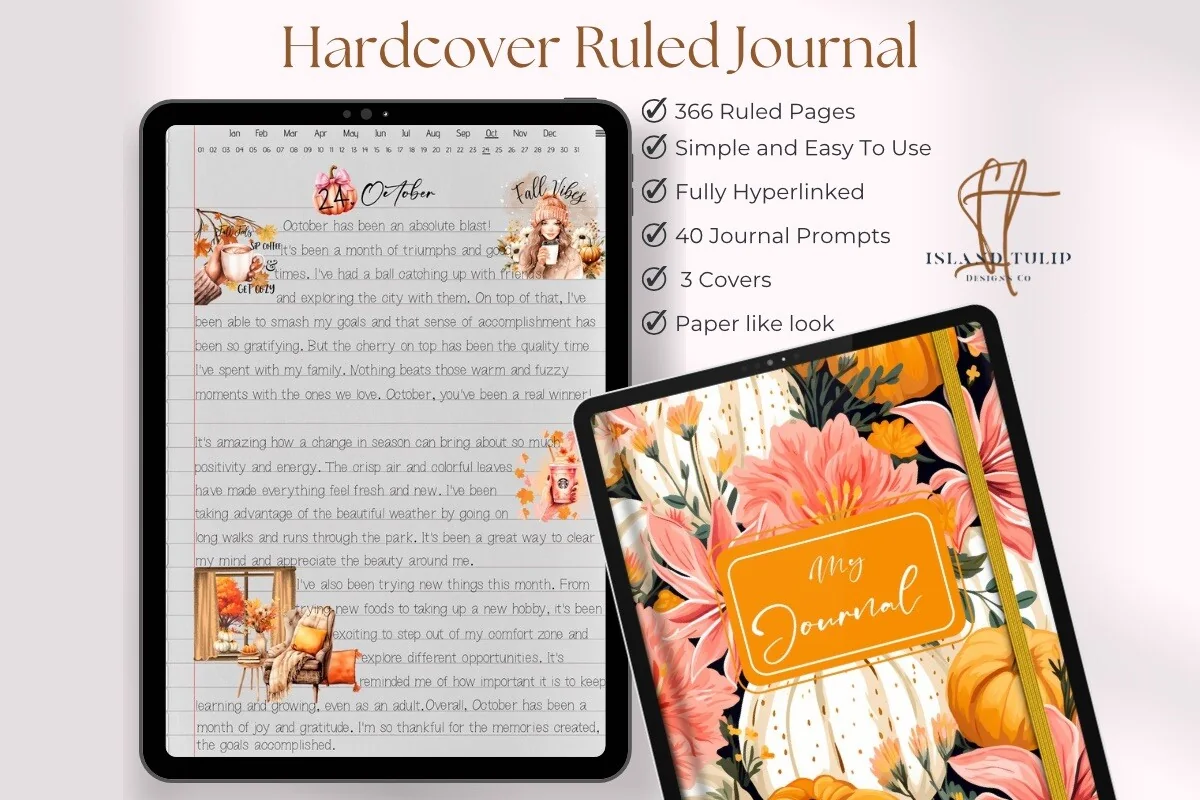
Orientation: PortraitLayouts: Ruled daily pages and month/day indexFormat: Digital journalDates: Month/day navigation; no fixed year shown
Best for: writing a short account of each cooking attempt in chronological order. Designed by Island Tulip Designs Co.
- 366 ruled pages, with month-and-day navigation pictured
- Three floral covers and a paper-like page design
- 40 journal prompts in PNG and precropped GoodNotes formats described
- Hyperlinked month-and-day navigation, without a fixed calendar year shown
This is the writing-first choice. A dated entry can hold the recipe version, what happened at the stove and the one thing to try next, without squeezing those observations into tiny recipe boxes. The journal prompts are general, not culinary. Its month-and-day structure also means you will need a handwritten recipe index if you want to find every attempt at the same dish.
Quick Comparison
| Journal | Writing structure | What you add | Digital fit |
|---|---|---|---|
| 1. Recipe Log – Printable & Digital Recipe | Recipe fields | Add trial notes yourself | GoodNotes / Notability |
| 2. Digital Notebook | Blank and two-column notes | Create every recipe heading | GoodNotes / PDF annotation |
| 3. Digital Ruled Journal | Ruled daily entries | Add a recipe index manually | GoodNotes prompts / linked journal |
Match the Page to the Part You Keep Forgetting
A recipe journal template should reduce the work of recording your attempt. Before choosing a file, look at the kind of information that usually goes missing. The most useful writing space may be a blank margin rather than another labeled box.
- Missing quantities or timings: use the Recipe Log’s ingredient and time fields as the base record. Leave room alongside them for your verdict. The narrow fields may need zooming on an iPad.
- Confusing versions: use the Digital Notebook’s two-column page. Name both versions and keep equivalent headings opposite each other.
- Missing context: use the Digital Ruled Journal for a short dated account. Start each entry with the recipe name and trial label so a manual recipe index has something clear to reference.
- Already have suitable pages: copy the four headings above into your current notebook. Buy another file only if its layout or navigation solves a problem you actually have.
From a Blank PDF Page to Your First Cooking Entry
Keep an untouched copy of your received files and follow the seller’s import instructions for your annotation app. The exact controls vary by app version. I have not tested the purchased archives or their links, so check the navigation before you rely on it during cooking.
Set up one trial, then reuse the structure
- 1Open the right file. If the received package is an archive, extract it and find the PDF or the app-specific file named in the seller’s instructions. A product preview is only a picture. Check that the imported page is large enough for the ingredient quantities you want to write.
- 2Create a working entry. Use your app’s page controls to make a copy where appropriate. Give the entry a recipe name, date and version label. For a general notebook, add your four headings by hand. Keep the original recipe separate from the space where you will record changes.
- 3Check the writing and navigation modes. Try writing a short quantity and following one existing tab. Hyperlinks are page navigation, not automatic recipe indexing. If tapping draws instead, check your app’s help for following links. Do this before cooking rather than while a step needs attention.
- 4Close the entry with a verdict. After the attempt, add one observation and one next action. If you use a chronological journal, add the recipe and date to a manual index. Before the next attempt, read that verdict instead of rereading every earlier paragraph.
Keep Trial Notes, Recipe Storage and Meal Planning Connected
These three jobs can share an iPad without sharing the same page. Give each a clear destination so an experimental quantity does not quietly become your default recipe.
- Trial journal → what happened: keep the actual quantities, equipment, observations and questions for each version.
- Recipe archive → what to repeat: store the settled ingredient list and method. Our digital recipe books and GoodNotes templates focus on organizing that collection.
- Meal planner → when to cook it: put the chosen dish into your week only when you are ready. These digital meal planners cover menus and grocery planning.
Use a simple reference such as “soup A, Nov 6” across the pages. That can be handwritten text; it does not have to be a custom hyperlink. A recipe journal PDF does not automatically calculate nutrition, convert quantities, schedule meals or synchronize changes between notebooks.
FAQ: Starting and Keeping a Recipe Journal
What is a good diary for writing recipes?
Choose structured recipe fields if you want ingredients and steps on one page, two-column notes if you compare versions, or ruled pages if you prefer a dated account. A notebook you already use can work. Check the writing space before choosing by the cover.
How do I create a recipe journal without a special template?
Write the source, actual quantities and equipment, result and next change on a blank page. Give the trial a date and version name. You can add a manual index when several attempts make the notebook harder to browse.
Should I copy the whole recipe into every trial entry?
Not necessarily. Keep a stable source reference and record the version actually followed. If you write only the changes, make sure you can still locate the original ingredients and method. A settled recipe can live in your separate archive.
Do I need to rate every recipe?
No. A short explanation such as “good texture, too sharp for me” can tell you more than a number. If you like ratings, define what they mean and keep preparation effort separate from flavor so one score does not hide the tradeoff.
The same specific language can preserve a meal you enjoyed away from home, but keep that record separate from your cooking trials. These restaurant journal ideas focus on what you ordered, your reaction and whether you would choose it again, rather than a recipe you have tested.
Can these journals calculate calories or check dietary suitability?
These are pages for handwritten records, with no advertised automatic calculation or dietary checks. The Recipe Log has a visible calories field, but a blank box is not a calculator. Confirm allergies directly and use reliable food-safety or professional advice for health decisions; taste notes cannot establish safety.
Give the Next Attempt One Clear Starting Point
The recipe journal ideas worth keeping are the ones you can use when you cook again. Start with a named version, an observation and one next action. Once a recipe is settled, move the clean version to your archive and let the journal keep the useful evidence of how it changed.
That version-and-observation habit can serve another creative interest, too. The experiment cards and session bookmarks in these hobby journal ideas offer ways to record a trial and leave a clear starting point for your next drawing, craft or practice session.
You May Also Like
This article contains affiliate links. If you buy through them, I may earn a commission at no extra cost to you. Read our affiliate disclosure.