Your outline looks crisp at full zoom, but the shadow turns into a flat gray patch when you pull back. Choosing Procreate tattoo brushes starts with that mismatch: a liner, a soft shader and a dotwork brush solve different parts of a digital flash drawing.
I selected seven sets by their descriptions and public previews, with a preference for useful stroke charts over dramatic cover art. These are tools for drawing tattoo concepts on an iPad. I have not installed the paid files, and this is a contents-and-preview comparison rather than a hands-on performance test.
The selection separates broad kits, smaller working sets and dotwork options. You can compare several approaches without treating every brush count as a reason to buy more. A compact set may be the better choice when it gives you the one outline and shadow combination your next illustration needs.
The best Procreate tattoo brushes for different marks
TL;DR: Seven Procreate sets for digital tattoo concepts and flash: two broad toolkits, three smaller or practice-focused choices, and two dotwork options. Start with the mark you need, then choose a pack; the previews do not establish real-world tattoo performance.
Quick Picks
- Best for needle-style marks: The Real Needles Tattoo Brushes
- Best for old-school look: 24 Traditional Tattoo Brushes
- Best for clearly divided kit: Tattoo Toolkit Procreate Brushes
- Best for compact starter selection: 12 Tattoo Art Brushes – Procreate
- Best for shading exercises: Tattoo Practice Procreate Brushes
- Best for combined dotwork kit: Procreate Tattoo Stipple Brushes
- The Real Needles Tattoo Brushes – Best for needle-style marks
- 24 Traditional Tattoo Brushes – Best old-school look
- Tattoo Toolkit Procreate Brushes – Best clearly divided kit
- 12 Tattoo Art Brushes – Procreate – Best compact starter selection
- Tattoo Practice Procreate Brushes – Best for shading exercises
- Procreate Tattoo Stipple Brushes – Best combined dotwork kit
- Stipple Shading Brushes Procreate – Best shading supplement
Broad kits for a complete flash illustration
Best for needle-style marks
1. The Real Needles Tattoo Brushes
Format: .brushset
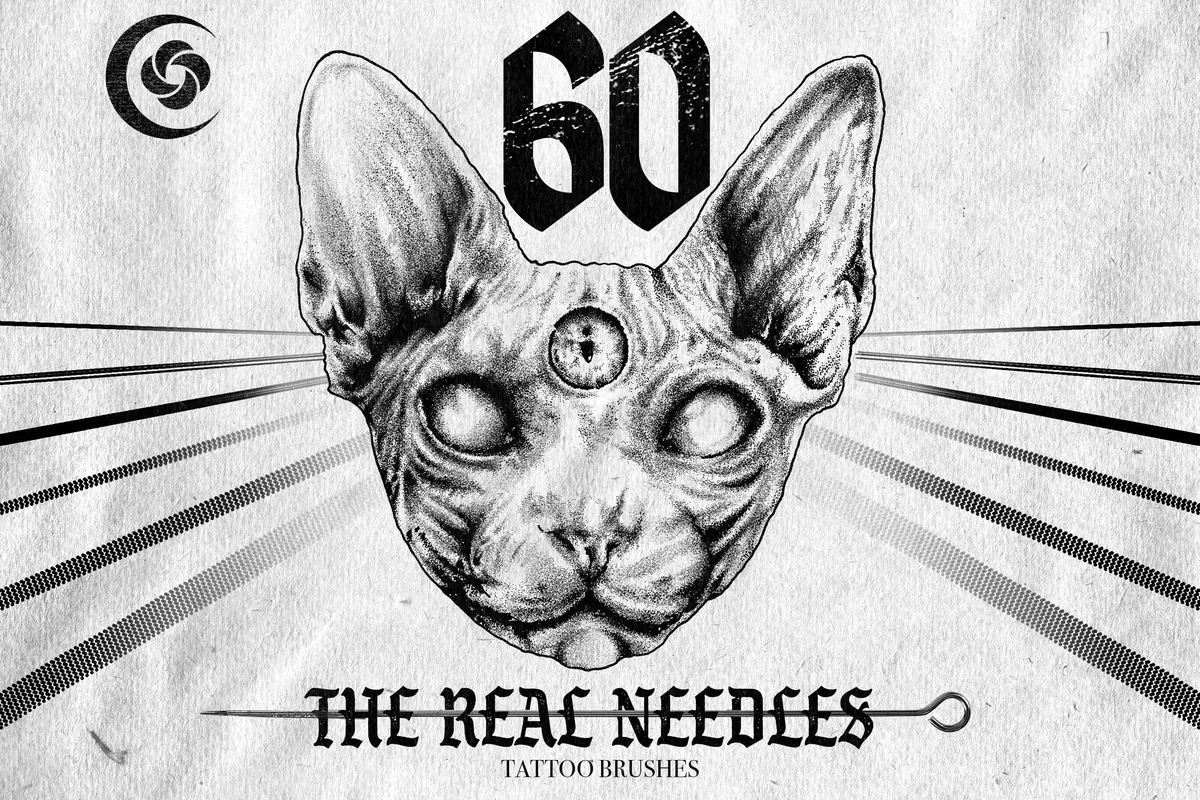
Best for: comparing liner, magnum and whip-shading effects on a digital drawing. Designed by EasyProcreate.
- 60 Procreate brushes
- Liners, round liners, magnums, round magnums, shaders and round shaders
- Stipple, whip shading and paper texture brushes
- Stroke charts show fine lines, grouped marks and textured shadows; Procreate only
Narrow contours, rows of dots and wider shading marks give this kit an explicit needle-style vocabulary for digital flash. Its charts are worth comparing if you want a magnum-like pattern or whip-shading effect in a drawing. Choose by those samples rather than total size. The names describe marks on a canvas, without demonstrating how physical equipment behaves or how a tattoo heals.
Best old-school look
2. 24 Traditional Tattoo Brushes
Format: .brushset
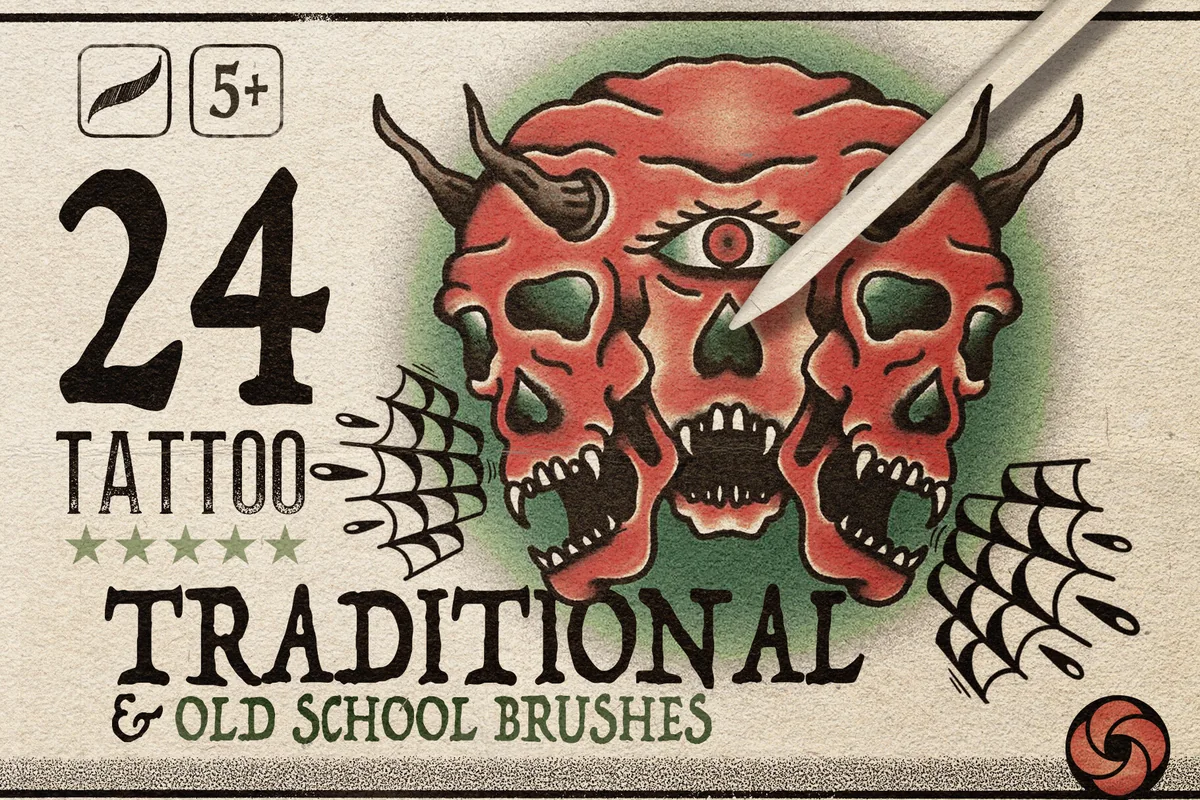
Best for: bold flash with grain, marker shading and limited color. Designed by EasyProcreate.
- 24 brushes advertised on the cover; Procreate-only brushset
- Ink and classic liners, vintage liner, wet marker and textured filler named in the description
- Stipple and dot shaders, charcoal, noise and blending brushes
- Previews show colored old-school designs, line samples and textured shading
A red heart, a heavy outline and a little grain give this set a distinct old-school direction. The marker-like fills and rougher edges work together in the previews, which is why it makes my shortlist for colored traditional flash. It overlaps with The Real Needles kit, so compare their stroke samples before buying both. Keep background texture restrained when the bold contour needs to carry the design.
Smaller kits and digital practice tools
Best clearly divided kit
3. Tattoo Toolkit Procreate Brushes
Format: ZIP archive
Best for: choosing a small set with a stated balance of line and shading tools. Designed by Arts For Peace.
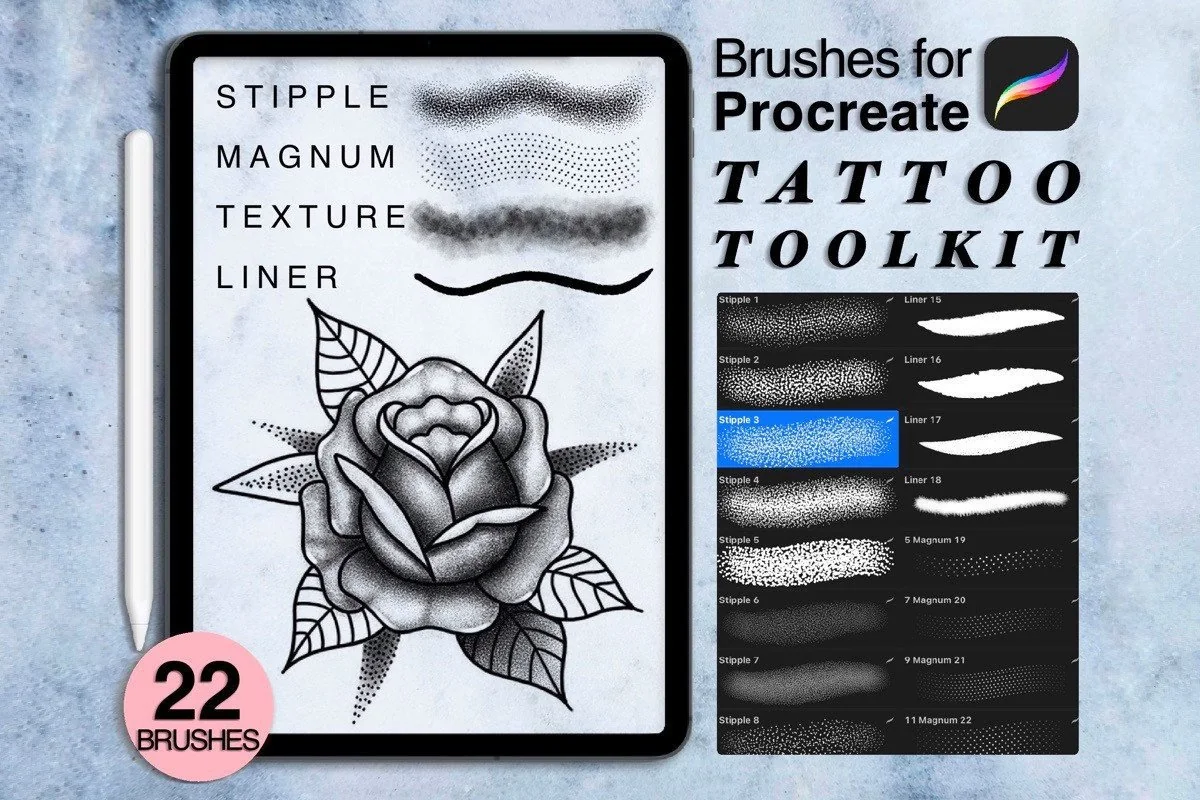
- 22 brushes: 9 stipple, 5 texture, 4 liner and 4 magnum brushes
- Four brush families with separate sample charts and a rose illustration
- Listing requires iPad, a pressure-sensitive stylus and Procreate 5.0 or higher
- ZIP archive; presentation photos, fonts and mockups are excluded
Four liners keep contour choices manageable, while nine stipple brushes put more of the variety into shadows. This is a useful middle ground between the compact 12-brush set and a much larger library. Check the packaging before purchase: the seller describes a ZIP with generic file extensions. The listing does not clearly identify the brush-file format inside, so ask the seller if you need that detail before buying.
Best compact starter selection
4. 12 Tattoo Art Brushes – Procreate
Format: Not specified
Best for: keeping the choice between outline and stipple brushes small. Designed by CCPreset.
- 12 Procreate brushes
- Designed for stippled texture and ink-style outlines
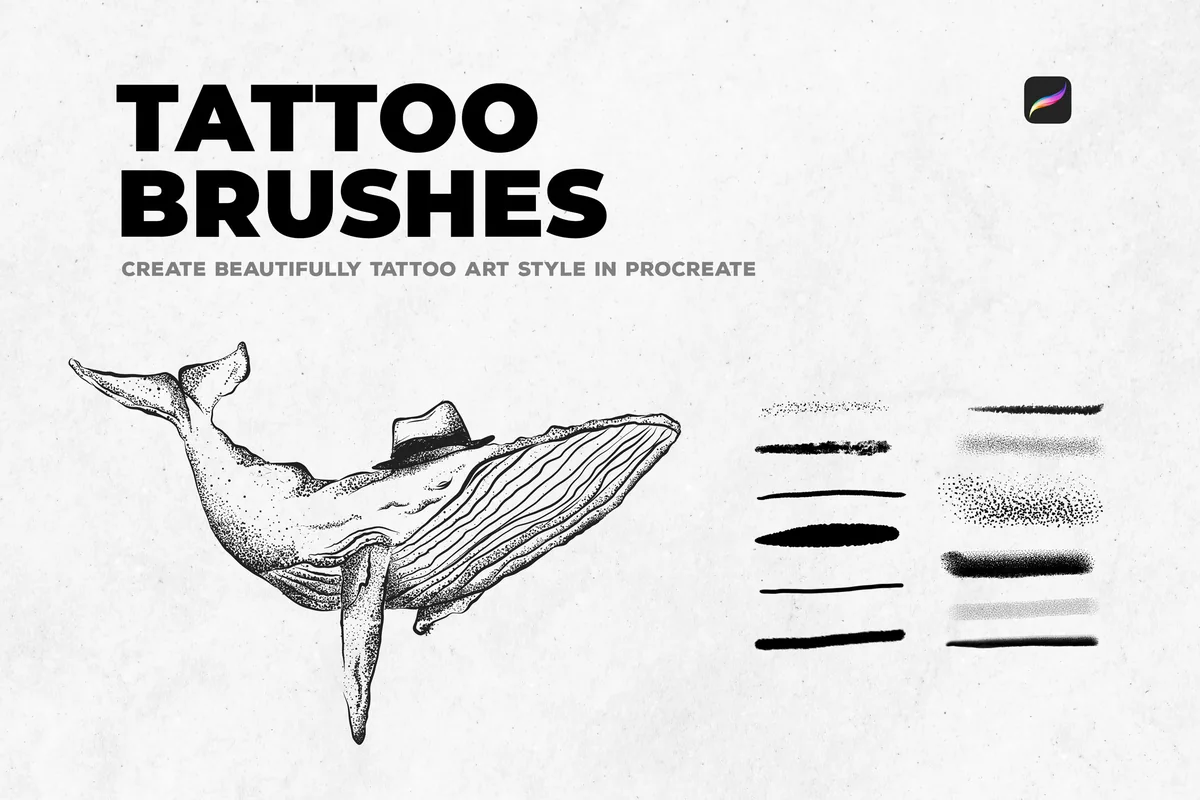
- Stroke samples and enlarged details on a whale illustration
- Exact file packaging and minimum app version are not specified
The whale example makes this small set easy to read: a clear contour, fine interior lines and dotted shadows. I like that focused combination for a first digital flash study, especially when browsing a huge library would distract from finishing the drawing. The brief listing does not promise a separate blending collection or paper pack. Treat the whale as an illustration of the look rather than an included stamp.
Best for shading exercises
5. Tattoo Practice Procreate Brushes
Format: Not specified
Best for: studying rows of marks and grayscale drawing on a digital canvas. Designed by Cnxsvg.
- Procreate tattoo brushes with bonus brushes; exact total is not stated
- Description suggests a 5000 × 5000 px canvas at 300 dpi
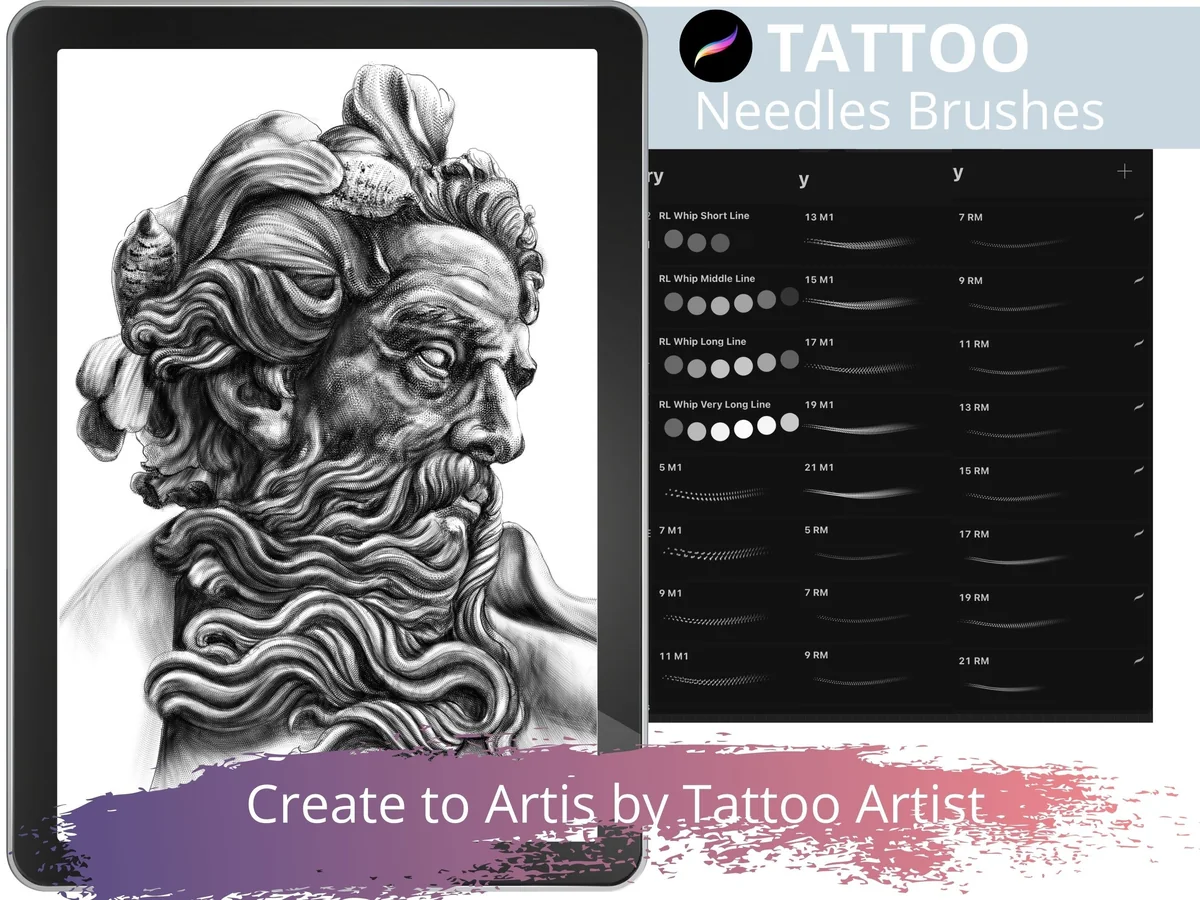
- Three previews show grayscale portraits, brush-library samples and RL/M1/RM practice charts
- The listing restricts resale, redistribution and conversion into new brush products
Repeated rows of marks give this collection a different purpose from the colored traditional kit: a starting point for grayscale studies and digital swatch exercises. Begin with a few shaded shapes before attempting the detailed portraits shown in the previews. The seller’s canvas suggestion is not a requirement for every project. With no exact brush total stated, compare the visible marks rather than treating the bonus brushes as a measurable value advantage.
Stipple and dotwork choices
Best combined dotwork kit
6. Procreate Tattoo Stipple Brushes
Format: .brushset
Best for: drawing the outline and dotted shadows within a focused collection. Designed by EasyProcreate.
- Cover advertises 30 stipple and line brushes
- A Procreate brushset combining liners and stipple shadows
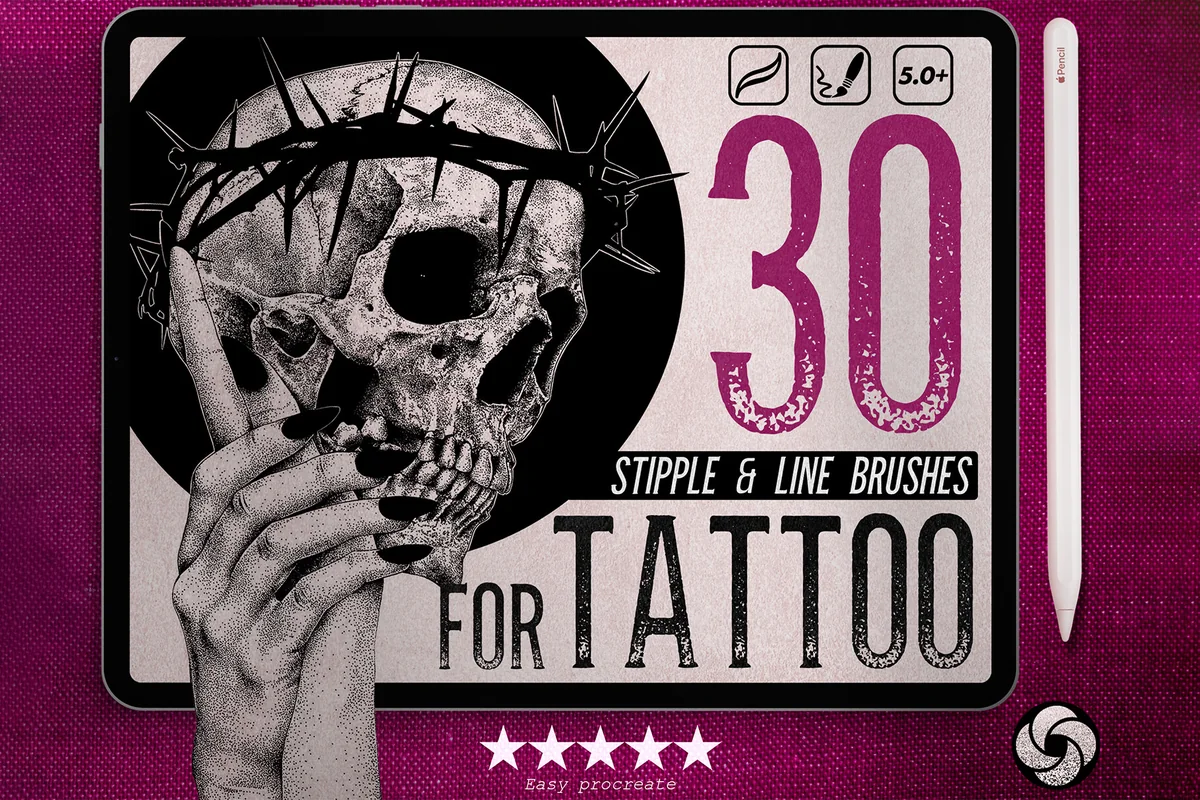
- Liner charts, fine-grain shaders and light bulb, tattoo-machine and seahorse illustrations
- Procreate 5.0+ shown on the cover; other apps are not supported
This combines liners and stipple shadows, whereas Aivos’s pack below concentrates on shading. The light bulb and seahorse examples show dotted texture alongside a defined contour, making the combined kit worth considering if both parts of your drawing need attention. There is enough shading overlap to compare the charts before buying both. The advertised 30 is a total for the set, not a count of separate shading techniques.
Best shading supplement
7. Stipple Shading Brushes Procreate
Format: .brushset
Best for: adding dotted texture when you already have an outline brush. Designed by Aivos.
- One .brushset containing 30 stipple shading brushes
- For iPad and Procreate
- Color, opacity and size can be adjusted
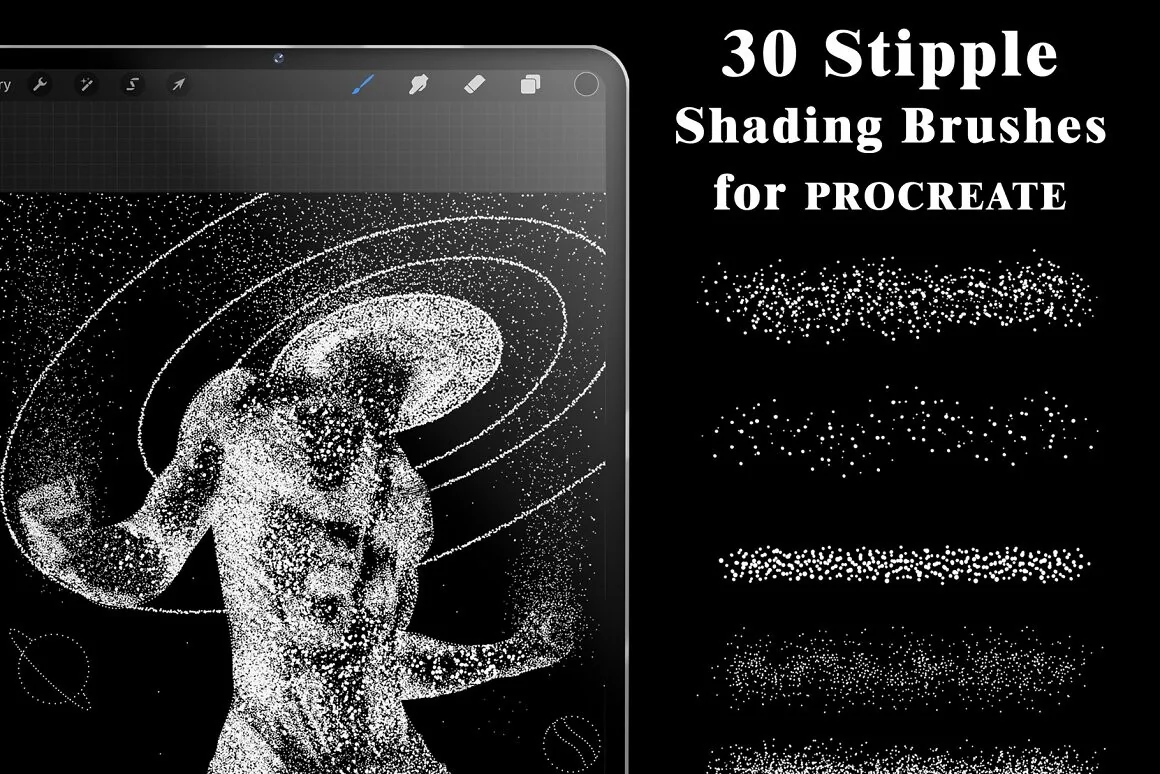
- Sample charts show different dot densities and a hummingbird illustration
Already happy with your outline brush? This is the targeted addition: the charts range from sparse dots to dense, soft-edged marks, without asking you to replace your whole kit. The hummingbird and space-themed illustrations also suggest uses beyond tattoo-style flash. Keep your existing liner for contours and add dots where they describe a shadow or change of surface. Color, opacity and size are adjustable; the pack contains 30 shading brushes.
Quick Comparison
| Set | Role | Contents | Useful distinction |
|---|---|---|---|
| 1. The Real Needles Tattoo Brushes | Needle-style toolkit | 60 brushes | Liners, magnums and whip shading |
| 2. 24 Traditional Tattoo Brushes | Traditional toolkit | 24 brushes advertised | Wet marker, grain and blending |
| 3. Tattoo Toolkit Procreate Brushes | Balanced small kit | 22 brushes | 9 stipple, 5 texture, 4 liner, 4 magnum |
| 4. 12 Tattoo Art Brushes – Procreate | Compact line and stipple | 12 brushes | Small, focused selection |
| 5. Tattoo Practice Procreate Brushes | Practice-oriented kit | Total not stated | Grayscale studies and stroke charts |
| 6. Procreate Tattoo Stipple Brushes | Line and dotwork | 30 on the cover | Liners alongside stipple shaders |
| 7. Stipple Shading Brushes Procreate | Stipple supplement | 30 brushes | Sparse dots through dense shading |
Choose the mark before choosing the pack
A finished flash sheet can hide how many different marks went into it. Before buying, look at the brush samples separately from the finished artwork. A detailed portrait demonstrates a visual direction; it does not tell you which brush will feel comfortable in your hand.
- For outlines: compare thin and thick samples, tapered ends and the visible edge texture. A smooth contour and a rough ink edge create different moods even when the subject stays the same.
- For soft shadows: look for the transition from dark to light. A broad gray swatch is useful only if it suggests the kind of edge you want around a cheek, petal or folded ribbon.
- For dotwork: compare sparse dots, dense grain and the size of the individual marks. Large dots can become a design feature; very fine dots can read almost like a gray tone when the image is reduced.
- For traditional flash: look at the combination of outline, solid color and grain. The 24-brush set has a more specific old-school visual direction than a neutral shading supplement.
Start with one main kit. If your current outlines already look right, a stipple pack is a targeted addition. If every part of the drawing needs a different treatment, compare the broader kits and keep a small working selection from whichever one you choose.
Brushes and stamps answer different questions
A stroke brush helps you draw a line or build a texture. A stamp places a prepared shape or motif. If you are looking for Procreate tattoo stamps, you may want a shortcut to composition, while this selection concentrates on tools for drawing the design itself. A rose pictured on a product cover is not automatically an included rose stamp.
This distinction matters when comparing a Procreate tattoo brush pack with a large bundle of flash motifs. Check whether the seller lists drawing tools, completed designs or both. If you want to draw original subjects, a modest liner-and-shader kit can be more useful than hundreds of stamps you will not use.
A digital flash sheet workflow you can adapt
For a first drawing exercise, keep the sheet small in scope: one original motif and a few variations are enough to see whether a mark belongs in the design. Work on separate layers so you can compare choices without rebuilding the whole image.
From rough motif to a readable flash sheet
- 1Set the brief. Choose one subject, such as a flower, bird or ribbon, and decide whether the sheet should feel bold, delicate or grainy. Keep reference material separate from the drawing and make your own composition. Decide what the viewer should notice first before you start picking textures.
- 2Sketch the shape. Make a loose sketch on its own layer. Check the outer shape at a smaller view before adding detail. Leave enough space between adjacent parts that a shadow will not turn two separate forms into one dark shape.
- 3Pick a liner. Try a small selection of liner strokes beside the sketch, then use one for the main contour. Keep the rough drawing underneath while you refine the visible outline. Avoid changing brushes every time the line becomes difficult; first check the scale and direction of the stroke.
- 4Add the shadow. Add the shading on another layer and compare a soft shader with a stipple brush in the same area. Start with one shadow shape rather than texturing the whole motif. The useful comparison is whether the form reads more clearly, not which brush makes the most dramatic swatch.
- 5Review the sheet. Pull back, compare the variations side by side and remove detail that distracts from the main shape. Preserve the layered working file before making a flattened sharing copy. Keep notes about the chosen liner and shader so you can return to the same visual treatment later.
Procreate’s Layers handbook explains how layered content is ordered and edited. Keeping the outline and shadow separate lets you compare alternatives while preserving the contour.
Make a swatch page that answers a real question
A swatch page does not need to display every brush you own. It should help you choose what happens next in the drawing. Use the same simple shape for each option so that the subject does not distract you from the difference between the marks.
- Contour test: draw a straight section, a curve and a small corner. Compare where the line gets heavier or breaks up.
- Shadow test: shade one rounded shape with a soft brush and another with dots. Keep an unshaded area so you can judge the transition.
- Scale test: view the same marks close up and at the intended presentation size. A texture that is attractive enlarged may merge into a solid patch when reduced.
- Combination test: put your chosen liner next to one shader. Decide whether their edge textures belong in the same illustration before adding a third brush.
This is also a practical way to compare the two dotwork choices. Aivos’s pack is described as a stipple-shading collection, while the EasyProcreate stipple set visibly includes liners. If you already have a favorite contour brush, the former has a straightforward supporting role. If you want lines and dotted shadows together, compare the latter’s charts first.
Keep texture from burying the drawing
Paper grain, scattered dots and dark outlines can all compete for attention. A useful editing pass asks what each one contributes. The Real Needles kit includes paper texture brushes, but that does not mean every flash sheet needs a textured background.
- If the silhouette is unclear: simplify the outline or the shadow shape before adding another texture.
- If fine details disappear: check the image at the size you intend to show it. Separate neighboring shapes or remove a few small marks.
- If everything looks equally dark: reserve some open areas and reduce competing shadows.
- If the paper effect dominates: compare the image with the texture hidden. Keep the version that makes the subject easier to read.
For more general contour styles, the lineart brush selection covers a different task. For digital tattoo-style flash, compare the contour alongside the stipple or needle-like shading effect you want to add.
Check compatibility and packaging before you buy
The app name is more useful than a broad promise that a pack works everywhere. These offers identify Procreate, and the relevant listings specify iPad. Tattoo Toolkit specifies a pressure-sensitive stylus and Procreate 5.0 or higher. Do not extend one product’s requirements to the whole list.
- Check the delivered file type. Several listings name a .brushset; others are less specific. An archive is packaging, so identify the actual brush files inside it and follow any seller instructions.
- Keep the listing’s requirements handy. Minimum app versions and stylus requirements are not consistently stated across these products. Ask the seller if your setup is uncertain.
- Distinguish art from included assets. Mockup photos, display fonts and example illustrations may be presentation material. The Tattoo Toolkit listing explicitly excludes those extras.
- Read the license for your intended use. Making an illustration and redistributing brush files are different activities. The practice set explicitly restricts sharing and converting its brushes into new products.
Procreate documents brush organization and import in its official Brushes handbook. Follow the guidance for your installed version alongside the seller’s file instructions; this comparison does not establish that every pack works on every version or device.
FAQ: choosing a tattoo-style brush set
Which set should a beginner choose?
The 12-brush set and the 22-brush Tattoo Toolkit offer fewer choices to sort through. The first is a compact outline-and-stipple option; the second gives an explicit four-family breakdown. Neither substitutes for learning to draw. Start by comparing a contour and a shadow on one simple shape.
Are there free tattoo brushes available in Procreate?
Procreate includes brushes you can explore before buying an extra pack, as its official Brushes handbook describes. This selection does not include a verified free tattoo-specific Creative Fabrica offer. Try the tools already available in your app, then buy only if you can identify a missing kind of line or texture.
Do I need a separate shading pack?
Only if your current set leaves a useful gap. Several broad kits here already include stipple and shading tools. Aivos’s pack makes most sense as a supplement when you like your existing liner and want more dotted textures. Compare that role with a combined line-and-stipple pack before buying both.
Can these brushes make a tattoo stencil?
They can help you draw digital line art, but this selection does not verify a stencil-export workflow, a thermal printer setup or a transfer-ready file. A finished shaded illustration and a usable stencil are different deliverables. Discuss the required design file with the professional who will use it.
Will a needle-style brush show how a tattoo looks on skin?
No. A digital brush creates marks in an illustration. Preview language about liners, magnums or whip shading describes the intended visual effect; it does not establish how physical equipment behaves or how a tattoo heals. This guide stays with digital design and does not teach tattooing procedures.
Should I buy the largest pack?
A larger count gives you more choices, but it can also give you more overlap. Choose by the task: traditional colored flash, grayscale practice, broad experimentation or a dotted shadow. The best value for your project may be the small pack that fills one clear gap.
Build a small working set, then draw
The most useful Procreate tattoo brushes are the ones that let you finish a coherent illustration. My starting shortlist is one main toolkit with a contour and shading style that work together. Keep the broader library available, but let the drawing decide when you need another mark.
If you already have a reliable liner, compare the dotwork options before replacing the whole kit. If you want a new direction from sketch through finish, choose a broad set by its sample strokes and visual style. Seven suitable offers are options to compare, not seven purchases to make.
You May Also Like
This article contains affiliate links. I may earn a commission if you buy through them, at no extra cost to you. Read the affiliate disclosure.